21 Ways to Teach with Echo360 – 20) Create video-based learning activities in your LMS
This is the twenty-first blog in our how-to series for educators and example 20 out of 21 ways to teach with Echo360. Read the introduction to this series here.
Why should I create video-based learning activities in my LMS?
Video-based learning is very effective for self-directed student learning as educative videos make it possible to learn on the move and explore far greater possibilities provided by digital spaces. For example, videos can be embedded from Echo360 into your learning management system (LMS, or alternatively known as a VLE) to link with other course content, quizzes, chat and assessments. Over 60% students now regularly access their LMS regularly through their mobile device (JISC, 2018), making these easily accessible too. Video also has a global reach, with over 22 billion daily video views and up to 80% of all internet traffic (IDC). But does it help learners? Well, studies have shown that learners are likely to remember far more from video-based activities, as only 10% is likely to be remembered from text-based content, 65% from visual content and 95% of the audio-visual content. Perhaps it is not such a bad thing that many from YouTube generation prefer learning from videos as they find concepts easier to understand when they watch someone explain it visually.
Embedding videos into your LMS can support your learners in a variety of ways. The LMS often contains rich course content in structured pages, with links to quizzes, discussions and other related content, but uploading and adding a video can be challenging. Adding video can help this content become more engaging, reduce cognitive overload from lengthy text documents, and encourage greater use of micro-learning activities. The activities could link flipped learning sessions, offer short primers on key concepts, provide revision aides, or be standalone tasks which replace some in-class learning. However you wish to your videos, it has never been easier to create and publish them for your learners. Let’s take a look at the short steps needed to embed your videos and begin creating great activities for your learners.
How can I do that?
There are a variety of ways that videos can be displayed in a LMS. The most common ways is to show a full list of all the lecture recordings for enrolled students (eg: into Moodle); this is ideal for conveniently publishing every recording and their associated Q&A and polling activities within an Echo360 window. However, if you prefer to also embed an individual video and build your own content around it, there are two simple tools to help you do this for all major LMS’s:
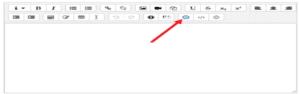
- Embedded videos – use your content editor to add the video window onto your page. An Echo360 button in your WYSIWYG toolbar allows you to pick any of your Echo360 videos, set the window size and start time.The video will be shown within your page without any additional Echo360 tools.
If your Administrator has enabled the link, they will be available within your page editing tools. This is available for each of the major LMS’s: Blackboard, Brightspace, Canvas, Moodle and Sakai. It will look slightly different in each platform, but here are some examples from our Moodle resource page.
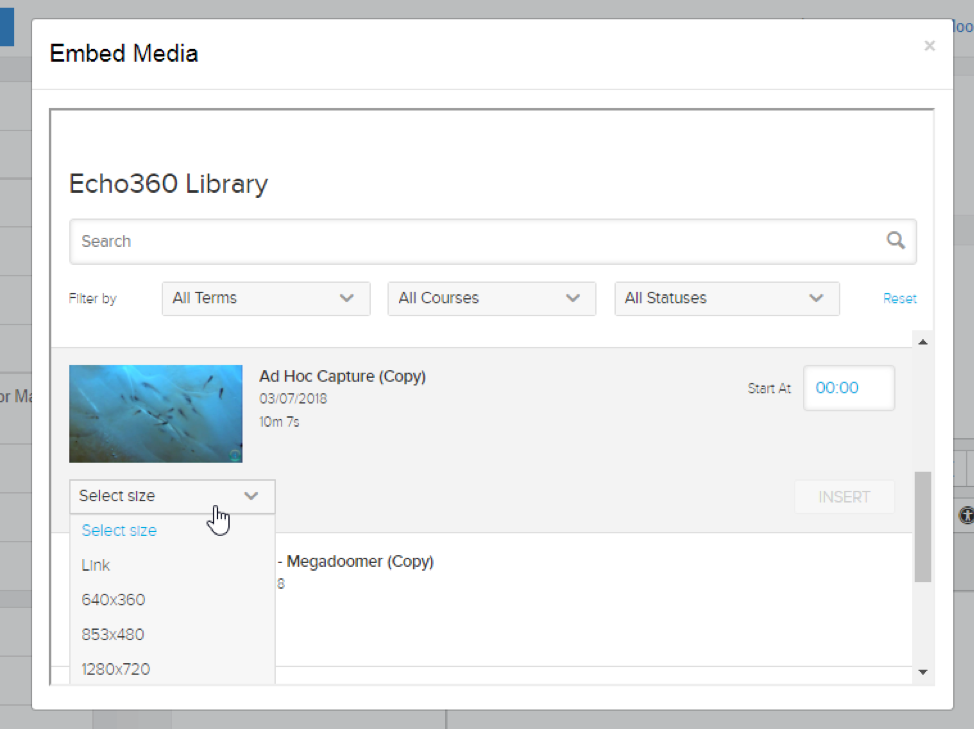
Click on the Echo360 button to open up a dialog box listing all of the video media in your Echo360 Library (media you own).
Find the video you wish to embed and select the window size and start time, and check whether you wish the video to autoplay when opening.

Once the item is added, students can open the page and view the embedded video. If you selected Autoplay or Start At configurations for the video, those are enacted for the user upon viewing.
Learn more about how you can embed videos in your LMS with step by step guides in our Resource Centre.
- Access links – an alternative to showing the video in your page is to create a hyperlink for you to include anywhere in your pages. Access Links can be created in Echo360 for any of your videos and pasted into your LMS content page. Clicking on the link opens the video in a new window/tab.
This approach is handy if embedding videos isn’t possible in your LMS (eg: if your institution doesn’t use one of the main LMS platforms, or your Administrator hasn’t enabled public links).
Instructors can create a link from either Echo360 Home page, or from the video button on a Section page.
- In your Library, click on the thumbnail image of your video or click the menu button on your video and select ‘View’.
- On a Section page, click on the video button for a recording,
 and select ‘Details’.
The Content Details page includes options to manage your video asset. To create a link, click on ‘Sharing’ and you are presented with two choices: to share with an individual, or to create the access link to share embed into other resources.
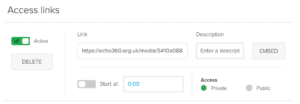
Generate the link by clicking, ‘Add Link’. A Link (URL) is created, as shown below. You may also add a description, define a start time, and choose to make the link public or private – a public link allows anybody to view the video, whilst a private link can only be accessed by institutional users.
Note, the ‘Embed’ option at this stage allows you to manually create a window showing your video in a web or LMS page. This produces the same embedded video view as above and is useful if not using one of the supported learning management platforms or you wish to add a link to an intranet or public website. Find out how to use this code in our guide to generating a public link or embed code for a video.
Anything else I should be aware of?
Videos are made available to you in your personal Echo360 media library whenever you record one of your teaching classes, upload a screencast (using Personal Capture or Universal Capture), or upload a video from the Echo360 app. You can also upload a video directly into the library from your own PC/Mac or cloud drive. Videos shared with you by colleagues are also visible in your Library. Any of these video assets can be added into your LMS course pages using either of the methods described above.
To create an embedded video in your LMS, your Administrator must enable Public Links. Instructions on how to enable these links for Instructors and Students are available in our Resource Centre.
If you wish to add a short excerpt from a lecture recording, edit the capture in the Content Details page, and save as a new copy (click ‘Save As…’).
Producing videos that are engaging and stimulate learning for your students requires some prior planning. Here are some brief steps to follow:
- State clear objectives, and outline the purpose of the video at the beginning, with a focus on meeting your learners’ goals.
- Keep your videos short. If you have a lengthy topic, break it up into bite-sized nuggets which range from one to two minutes. For a lecture, consider recording videos of less than 5 min in duration.
- Include voice-over and don’t simply repeat any text on screen. Try adding additional context or topics of interest – but don’t stray too far off topic! When learners are left by themselves, the text or visuals in a self-produced video need to be supported by audio.
- Considering including a transcript or captions. Studies show captions increase the completion rate of video from 40% to 80%. These can be easily created in Echo360 – learn more in managing transcription of capture.
- Record your screen and perhaps a webcam view of yourself. This makes your video seem more personal, and makes learning more enjoyable and memorable.
Does it work?
Video is fast becoming the most dominant learning medium amongst the current generation of students. However, not all video content will succeed with your students. it is therefore important to understand how different video types can be used for different types of learning needs. Let’s look at five different types:
- Contextual video – link abstract or theoretical concepts with real-world examples; these can be particularly useful for introducing new topics and overwhelming learners with 50 page textual documents.
- Demonstration video – a recorded demonstration, simulation or animation to guide learners stepwise through an example. This could help where practical skills are required for the course, real-world examples would be risky, or there are multiple steps to explain.
- Analogy video – help your learners develop cognitive shortcuts to practical problems. Visual analogies can stimulate learning more effectively than verbal- or text-based explanations. Use for new or tricky topics, linking ideas, or to improve retention on threshold concepts.
- Illustrative video – combine visual, text and commentary to give concrete examples. Keep it simple, for example using powerpoint graphics and animations, linked to your audio narration. A screencast of this would give a compelling explanation which learners would remember.
- Learner generated video – allow your learners to share their experiences, ideas and knowledge. Social media is awash with self-generated video content, so give your students the freedom to express themselves and share with each other. It will be fun too!
As educators seek to create new ways blend learning and produce more flexible pathways for the next generation of students, it is vital that media and learning platforms can offer engaging resources that are easily accessible. By linking video management platforms, such as Echo360, with the LMS, educators can link video with other course-based resources, develop new ways to deliver learning activities, and benefit from using professional video-based and captioning tools. Meanwhile, students benefit from the convenience of accessing rich media content from a single source and the deeper learning potential derived from merging video with interaction and communication tools.
Where can I find more information?
- Using Echo360 with your LMS;
- How to use Echo360 home media assets;
- JISC Report – digital experience insights survey 2018: findings from students in further and higher education;
- Choosing The Right ‘Kind’ of Video for learning – 5 Styles Of Video-based Learning;
- Getting started with video-based learning;
- Five benefits of video-based learning;
- Video in Higher Education
In case you missed the previous posts in the series, here they are:
- Intro: A New Blog Series for Educators: 21 Ways to Teach with Echo360
- Part one: How to Record Your Class with Echo360
- Part two: How to Record an Asynchronous Screencast with Echo360
- Part three: How to Schedule Recordings of Your Classes with Echo360
- Part four: Lights, Camera, Action! Teaching and Live Broadcasting with Echo360
- Part five: Increasing Student Engagement: Creating Student Polls, Questions, and Other Activities
- Part six: Increasing Student Engagement: Facilitating In-Class Discussions and Group Work
- Part seven: Increasing Student Engagement: Delivering Live Interactive Teaching to Off-campus Learners
- Part eight: Increasing Student Engagement, Without Recording
- Part nine: Flip Your Teaching with Interactive Presentations
- Part ten: Flip Your Teaching with Seeded Discussions
- Part eleven: Flip Your Teaching with Screencasts
- Part twelve: Deliver Interactive Classes Using the PowerPoint Ribbon
- Part thirteen: Flip After Class with Discussions and Screencasts
- Part fourteen: Record in-class clinical procedures
- Part fifteen: Teaching to a class of distance learners
- Part sixteen: Facilitate discussions in small group teaching sessions
- Part seventeen: Create and Facilitate an Open, Online Course
- Part eighteen: Using Learning Analytics During my Class
- Part nineteen: Use Confusion Alerts to Review Teaching Delivery
Learn more about Echo360.